
In the digital age, where visual communication is paramount, the need for effective screen recording software has never been more critical. Whether you’re a content creator, educator, or a professional wanting to showcase your skills, the ability to capture your screen seamlessly is a valuable tool. With the advent of Windows 11, Microsoft has introduced new features and improvements, making screen recording more accessible and user-friendly. In this article, we will delve into the world of screen recording software on Windows 11, exploring the features, advantages, and an easy step-by-step guide to get you started.
The Evolution of Screen Recording on Windows:
Windows 11 builds upon the foundation laid by its predecessors, incorporating several enhancements to provide users with a more intuitive and efficient screen recording experience. While Windows 10 had the Xbox Game Bar for basic screen recording, Windows 11 takes it a step further with the introduction of the new ‘Capture’ tool.
Capture Tool: A Native Solution for Screen Recording:
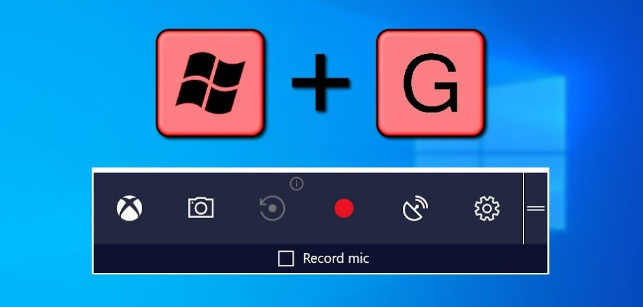
The Capture tool is a built-in feature on Windows 11 that allows users to record their screen effortlessly. To access the Capture tool, press the ‘Windows’ key + ‘G’ on your keyboard, opening the Xbox Game Bar. From there, you can click on the camera icon or use the ‘Win + Alt + R’ shortcut to start and stop recording. The Capture tool is a versatile solution, suitable for a wide range of applications, from creating tutorials to capturing in-game footage.
Key Features of Windows 11 Capture Tool:
1. Ease of Use: The intuitive interface of the Capture tool makes it easy for both beginners and experienced users to navigate. With a few clicks, you can start recording your screen without the need for third-party software.
2. Customization: Windows 11 allows users to customize their recording settings within the Capture tool. You can adjust video quality, choose between full-screen or specific window recording, and even enable microphone audio for narration.
3. Editing Capabilities: While the Capture tool is primarily designed for basic screen recording, it offers limited editing capabilities. Users can trim their recordings directly within the tool, saving time on post-production tasks.
Third-Party Screen Recording Software for Windows 11:
While the built-in Capture tool is a convenient option, third-party screen recording software provides additional features and functionalities for users with more advanced requirements.
1. OBS Studio: One of the most popular open-source screen recording software, OBS Studio, is compatible with Windows 11. It offers a wide range of customization options, including multiple scenes, sources, and advanced settings for professional recording.
2. Camtasia: Known for its user-friendly interface and powerful editing capabilities, Camtasia is a versatile screen recording and video editing software. It supports Windows 11 and is ideal for creating polished and professional-looking recordings.
3. ShareX: For those seeking a free and feature-rich solution, ShareX is an excellent choice. It supports various formats, provides editing options, and even includes tools for capturing screenshots, making it a comprehensive screen recording package.
Choosing the Right Software:
When selecting screen recording software for Windows 11, it’s essential to consider your specific needs and skill level. If you require a straightforward solution with basic editing features, the built-in Capture tool might be sufficient. However, if you need more advanced capabilities or plan to delve into video editing, exploring third-party options like OBS Studio or Camtasia could be beneficial.
Easy Steps to Record Your Screen on Windows 11:
Step 1: Open the Capture Tool or Third-Party Software:
- For the Capture tool, press ‘Windows’ key + ‘G’ to open the Xbox Game Bar and click on the camera icon or use the ‘Win + Alt + R’ shortcut.
- If using third-party software, launch the application and familiarize yourself with the interface.
Step 2: Adjust Settings:
- In the Capture tool, customize your recording settings, such as video quality, recording area, and audio preferences.
- For third-party software, configure settings according to your preferences, including resolution, frame rate, and audio inputs.
Step 3: Start Recording:
- In the Capture tool, click the record button or use the specified shortcut to start recording.
- If using third-party software, locate the record button or use the designated hotkey to initiate the recording process.
Step 4: Capture Your Content:
- Perform the actions you want to record, whether it’s demonstrating a software process, giving a presentation, or showcasing gameplay.
Step 5: Stop Recording:
- In the Capture tool, click the stop button or use the same shortcut used to start recording.
- For third-party software, locate the stop recording button or use the designated hotkey to conclude the recording.
Step 6: Edit (Optional):
- If using the Capture tool, you can trim your recording directly within the tool.
- For third-party software, open the recorded file in the respective application to make any necessary edits or enhancements.
Step 7: Save and Share:
- Save your recorded file in the desired location on your computer.
- Share your recording with others by uploading it to a video hosting platform, sending it via email, or using it as needed.
Tool: Pinterest video download
Conclusion:
Screen recording on Windows 11 has never been more accessible, thanks to the native Capture tool and a variety of third-party software options. Whether you opt for the simplicity of the built-in tool or the advanced features offered by third-party applications, the ability to capture and share your screen is a valuable skill in today’s digital landscape. With the step-by-step guide provided, you can embark on your screen recording journey, creating engaging and informative content with ease.